Installing your Fence Package
How to Install Your Fence Package
Part quantities will vary depending on the fence package that you purchase
Standard Hardware Kit:
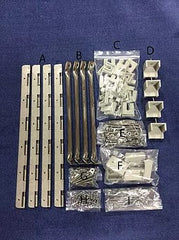
A- Lift-Lock Slip Hinges
B- Stainless Steel Fence Braces
C- Fence Riser Kit (pack of 26)
D-Universal Gate Stops
E- Fence Bolt Kit (pack of 26 stainless steel)
F- Pinch Guard Kit
G- Fence Brace Attachment Bolts
H- Self Tapping Screws for Hinges
I- Fence-to-Fence Attachment Bolts
Tools Needed:
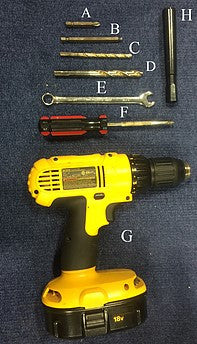
A- Phillips Drill Bit
B- Square Drill Bit
C- 1/4" Drill Bit
D- 3/8" Drill Bit
E- 7/16" Wrench
F- Phillips Screw Driver
G- Drill
H- Marker/Pen
If you are starting with fence over a newly carpeted deck, you don’t necessarily have to put the new fence where the old was. You have the option of leaving a deck in the back for gas tanks to sit outside the fence or to increase or reduce the deck in the front. First you’ll want to bolt the individual sections together and install the gates, then sit the fence on your deck. The 32” long radius piece goes across the 8’ section of the deck. (identify the left from right) Your fence will be 92” wide (32” Corner, a 28” gate, and another 32” corner). Our fence is generally but not always pre-drilled. The stern gate is NOT pre-drilled so that you won’t have to choose a specific gate for the rear. The stern gate on regular fence packages is not intended to be used as a gate, but as a filler piece. Simply drill the gate and corner pieces to place two fence to fence bolts per side to hold it in place. The 92” stern piece in the square stern groups are NOT pre-drilled, because we’ve had difficulty when individuals use the wrong piece, and not noticing until it was to late.
There is no “right or wrong” way to install the fence. Once you’ve positioned it where you want, mark where the holes will be in the carpet, it’s easiest to use a punch or something to score the carpet using the holes in the fence as a pattern. If you chose to drill the floor holes from the fence be careful not to scar the fence paneling with the drill. The washers for the fence bolts go on the bottom. If you have a floor plan that has a rear gate, it should be bolted in place so that it won’t open. This gate is a filler piece and should not open, thus we do not send a hinge or gate latch, but we have included 4 bolts (2 on each side). This gate is NOT DRILLED, so you don’t have to select a specific gate for the back. Fence braces generally do the most good near the gates. Give some consideration to your furniture group so that a fence brace doesn’t interfere with seating.
INSTALLING SUNDECK PADS
Installation of the Sundeck Cushion
The Full Sundeck packages from FenceforPontoons.com includes two comer pads and a rectangle center pad. The Stem Entry Sundeck uses the same pads except it only has one comer pad for the left rear of the pontoon boat. The following instructions are for installing those pads. Your regular Sundeck comes with the following parts.
3- Piano Hinges, use one per pad to allow the pads to be lifted up. 2-Gas Struts with mounts
2-Gray Plastic clips
Step 1. Start by laying the pads across your sundeck. Once you have the fit desired for your cushions you can begin the installation process.
Step 2. Starting with the center cushion, install the piano hinge on the back of your fence closest to the interior of your pontoon boat with the provided self-tapping screws. This will allow for the center cushion to be lifted out of the way when tilting your motor up. Install the plastic clips to the back side of the center cushion to lock the center cushion in place on the interior sides of the U style comer fence.
Step 3. The side cushions install with the hinge on the top of the Sundeck U rail on the very back of the pontoon boat (away from the interior). Once the hinge is mounted on the rail, screw the hinge into the cushion. Install the Flat ball mount on the inside of the Sun-Deck U towards the back. The Angled Ball Mount gets mounted to the cushion.
*Important note. The gas strut must be mounted so that it is completely flat when in the down position. Otherwise the cushion will want to lift back up.
